For arts educators, remote teaching brought on by the Covid-19 pandemic is incredibly challenging.
Live ensemble performance cannot be accomplished alone, no matter how fast your video conference software runs.
Rehearsing a band remotely is hard.
Here’s how to make it a little easier.
The first step in solving any problem is recognizing there is one. So let’s just name the elephant in the room.
There’s no getting around it — YOU CANNOT PLAY TOGETHER ALL AT ONCE like you could in a band room. It just won’t work.
There. Feel any better?
Of course not. Not yet. Next we need to figure out what we CAN do.
Let’s dive in.
Rehearsal isn’t virtual
What it is — and what it isn’t
Just because you can’t play together doesn’t mean you can’t be together.

You’re probably doing this already — get on Zoom or Google Meet at the regular time, with the instruments out, and BE together.
This will at least provide some sense of “ensemble-ness.” All students must mute their microphones at all times, otherwise you’ve got an unworkable cacophony on your hands.
Give your students something to play along to.
They can’t listen to each other, but they should listen to SOMETHING. You’re probably already doing some degree of this with Smartmusic or another similar app.
Remember “the first step in solving any problem is recognizing there is one” from a minute ago?
You 


You can try. And I’m sure you have. And you’ve discovered just how terrible it is.
There’s lag, there’s bandwidth, there’s internet connection speed, there’s hardware processing power, there’s device microphone quality….
Technology and physics are not on our side here.
There is latency between any 2 people over a digital connection. It’s similar to people on opposite sides of the field listening to each other for pulse.
We all know what happens there, and network latency is even worse with digital since every device introduces its own delay. There is no way to overcome this until we can time travel.
So don’t use this time to judge your students’ playing. There will be plenty of time for that. We’ll talk more about that later in the piece.
Math class
Virtual Band Rehearsal = Math Class
Instead, use this time to TALK with your students. Do your best impression of a math or history teacher:

- Introduce a concept
- Explain it
- Demonstrate it
- Preempt common pitfalls
- Demonstrate again
- Ask for questions
- Have them try it at home
- Ask for questions again
- Repeat
“But TJ” I can hear you saying. “I’m not a math teacher! I can’t just ask if they can play their part! I need to hear them play it!”
I know. And we’re getting to that.
Right now, I’m only talking about how to use ensemble Zoom time. Because “hear them play it” ain’t how we’re using ensemble Zoom time.

Massive caveat
In math class, all the students are learning the same concept at the same time.
In band, all the students are playing their separate parts.
So “hey flutes, watch out for this common pitfall in measure 3…” will bore the crap out of everyone who’s not a flute player.
Be ready for this.
“Ok everyone spend 5 minutes practicing measures 1-10 while I talk to each section.
Mute your mics and speakers. Watch the chat to see when it’s your section’s turn.”
– You, to your band.
In the next section, we’ll talk about how to handle this process, and how you and your students can make the most of ensemble Zoom time by preparing ahead of time.

Download the Checklist
Want to print this guide and share it with your staff or student leaders?
Download the PDF version right here!
Print it, email it, or share it around with your co-teachers or ensemble staff.
Here’s how.
How to Rehearse Your Band Remotely

Here’s the process for rehearsing your band remotely. This method would work for chorus and other performing arts groups, too.
We break this process into 3 important segments:
- Last week
- Right now
- Next week
Each of these segments should take up ¼-½ of your rehearsal.
Let’s look at these segments one at a time.
1) “Last week” – The Assignment Assembly
This segment assumes that you’ve already given your students a playing assignment.

If you’re preparing for an upcoming semester or something similar, you may have to skip or adjust this step a bit.
Jump down to the “Next Week” segment to see how that assignment should work.
The next steps assume that you’ve collected video clips from your students. This segment represents the first ¼-⅓ of rehearsal.
Mix together their audio
Once you have the videos your students have submitted to you, you’ll have to mix together their audio.
That sounds like a daunting task, I know. But if you use the right tool for mixing ensemble audio, it’s MUCH easier than you think — more on this later.
You can merge the whole group, small sections, or anywhere in between — anything you think will be useful for your students to hear.
Of course you’ll want to hear it, too. But this article isn’t about how to critique and judge your students’ individual playing.

Play back the merged audio during virtual rehearsals
Play the audio for them on the video conference/virtual rehearsal, and critique what you hear, as you hear it.
This is where the virtual band rehearsal can almost start to feel like a real rehearsal — almost.
So now you’d spend a few minutes provide feedback during rehearsal for individuals and/or groups. Again, this is the easy part.
But in order to make the virtual rehearsal run as smoothly as possible, you’ll need to add an extra step or two.

Write down your feedback in advance
This is an audio and video file, remember? You can listen and critique their playing anytime — which means you can prepare ahead of time!
That might not sound like a lot of fun. Most of us don’t get into arts education so we can take notes on what we hear in our headphones.
We do it so we can listen and immerse ourselves in the performance and work to inspire and empower our students to improve.
But think about it—
How many virtual meetings have YOU been a part of in which you watched other meeting attendees waste time or drift off topic?
It happens ALL THE TIME. And it’s an immediate productivity killer.
Preparing and writing down your feedback in advance allows you to keep the virtual rehearsal moving, so you won’t lose your students’ attention and interest.

Make them take notes & submit them as homework
Require students to take written notes on the feedback you give them. In this way, your virtual band rehearsal is fairly similar to math class—or maybe history class.
After your video rehearsal is over, require that your students send you a typed/written copy of their notes.
History class again.
They can submit their notes by whatever method you’d prefer—email, Zoom chat, etc. Just make sure it’s private/direct to you. If they’re shared with the rest of the band, the kids will all copy from each other.
And then, like your history department colleagues do, grade their written homework. Compare their notes to your feedback to be sure they were listening.

Bring it back to music: “play it again”
Here’s where all that written back-and-forth pays off — assign them ANOTHER video of that same chunk, this time incorporating your feedback.
When you listen and critique each student (which you should do on their individual videos), you can call out specifically whether or not they incorporated their assigned feedback.
2) “Right now” – The Solo Showoff
The next segment represents the middle ¼-⅓ of rehearsal. You’ve already listened to last week’s audio. Now it’s time for some right now audio.
We’ve said in this article and in others, like our “You’re Doing Virtual Band Videos Wrong” piece, that you can’t judge your students’ playing over Zoom live and in real-time.

But you can get close enough for this next bit.
One at a time, some number of students (kudos if you can get through all of them) will unmute their mic, and play their chunk solo, live, for everyone to hear.
They will HATE this part. Do it anyway.
Critique, and allow the student to self-critique. Move on quickly. No need to dwell too much on each student.
Just enough so they know you’re still listening, and their practice still matters — even if rehearsals are weird now.
3) “Next week” – The Progress Process
This segment discusses how to give your students "in real life" playing assignments, even when you have virtual rehearsals.
Here’s how to assign a chunk of music to your students, probably a week in advance, to keep your virtual rehearsals running smoothly.
It might sound self-explanatory, but there are some important steps in the virtual version of this process that make it worth discussing.
Here we go.
Introduce the music
The first step is easy: introduce the music during your virtual rehearsal/video “class” time.

- Show the score/parts —
Use the share screen function on your video conferencing app - Play audio file —
Be sure your video app allows “share computer audio” so they can hear it - Do band director stuff —
This is where you get to pretend you’re back in the band room
After that one blissful moment of actual music teaching, you have to drag yourself back to the reality of Zoom.
Ask for questions. Getting them to talk about the piece before they play at home is about the closest you can get.
Play it!
Now it’s the students’ turn to pretend they’re back in the band room — they have to play it!

- Play while muted —
Give students ~5 minutes to noodle through their part at home (on mute) - Answer questions —
Bring them back, ask them for questions again. - Repeat —
Maybe repeat these last few steps again. The more playing the better!
Assign it
Now it’s time to give out the assignment. Explain the measures or sections each student must practice and submit.
Ideally, you’d want your students to submit their videos at least 24 hours before your next virtual rehearsal.
That will give you time to merge all the audio and take notes on what you hear, as described above.
Combine audio
How to merge audio files FAST
Use Cadenzify. End of tip. I know you’ll need more info than that. But that really could be the end of the advice.
Why, you ask? Because it will save you hours and hours of editing time, compared to the old way.
Let me show you what I mean.

The Hard Way
If you wanted to combine the audio from your students’ submitted video assignments today, here are the steps you’d have to go through.
Your process might be a little different here or there, but in general, this is what it looks like:
- Do students have the software?
Best laid plans of mice and teachers go awry if students don’t have access - Collect videos from students
Dropbox? Google Drive? Email? Google Classroom? — a pain - Extract audio from video clips
Maybe you’re a pro at VLC or another DAW. Maybe not. - Add clips to your editing tool
Audacity? Final Cut? Adobe Premiere? iMovie? Maybe even Quicktime - Manually align video clips
This is the REALLY fun part, especially when you have lots of tracks - Re-sync video, if applicable
If you separated audio from video, now the video is out of sync – go realign that - Adjust certain students
Volume & quality is effected by students’ playing AND their recording technology - Pitch adjustment
We all have that one student who’s perpetually ¢5 sharp

Even if you’re not interested in attaching videos or adjusting certain players, you’ve got a long process ahead of you.
And anyone who has a project like this before knows that collecting and organizing video submissions takes like 70% of the time and effort.
Ad hoc video submission projects are WAY harder to manage than most folks realize — never mind editing.
The whole project is exhausting.
The Cadenzify Way
Obviously we’re superfans of this system, that’s why we’re writing about it. But seriously, you have to check this out.

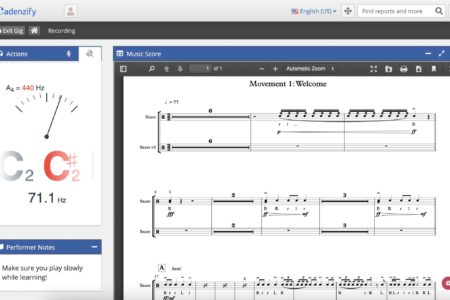
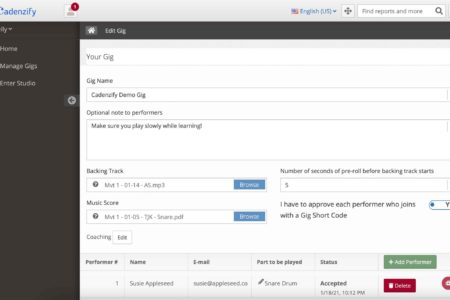
Cadenzify is software that lets your students practice, record, and submit their videos in one place, with no extra software or delivery method.
It organizes submitted videos in one place, and combines audio from multiple videos automatically.
The system is web-based, so students don’t have to download or install anything, and it runs on every laptop or computer — even Chromebooks.
How it works for students
Students can see a copy of their music and hear a guide track, all from within the web app — this part is similar to SmartMusic.
The interface has a practice mode, so students can play along with their music as many times as they want before recording themselves.
Once they’re ready, the can record their video and automatically submit it to you — no need for attaching video files or sending links to Google Drive folders.
Teachers’ Admin View
The teachers’ admin interface organizes all these video clips into “gigs,” and notifies teachers when new videos have been submitted.
Cadenzify lets teachers fine-tune their students’ audio files — literally.
You can adjust volume, timing, and pitch all from within the web interface — again, no extra software needed (Audacity, Pro Tools, etc).
How it saves you time
Cadenzify does 2 things that will save you TONS of time when collecting playing videos from your students.
You don’t have to use both features, but once you see how it works, there’s no way you’ll want to skip them.

1) Collect & organize videos automatically
If you’ve done a project like this before, you’ve probably discovered how much time the organization takes.
The logistics of collecting and keeping track of all the video clips are a huge pain, even if it’s just a few dozen.
Cadenzify handles all of that for you.
And that’s true for the students, too. How many emails or raised-hands-via-Zoom have you fielded that said “Teach, I tried to upload my video but it didn’t work…”
None of that to worry about.

2) “Mix down” or merge audio instantly
This is really the secret sauce that makes Cadenzify so perfect for virtual rehearsals.
If you want to combine your first and second trumpet audio clips and play them back together to hear the harmony, imagine having to do that manually.
Cadenzify will do it for you automatically within just a few seconds.
The automatic organization and the lightning fast audio mixdowns make Cadenzify the perfect tool for any virtual or remote rehearsal.
Try Cadenzify for your school
Cadenzify is in “beta” mode for the next few weeks. That means it’s FREE — but not for long.
Grab your free Cadenzify account and start uploading your scores and backing tracks. Your students will be submitting videos before you know it.
Big picture
Some notes on the whole process
When conducted this way, virtual rehearsals are an opportunity for your students to "expand their ears" by listening to the group.

Young musicians are often so focused on ‘survival mode’ playing that they can’t really absorb what’s happening around them.
Now they can.
These merged audio files and communal discussion time during virtual rehearsals lets students separate the tasks of listening and playing — which strengthens both.
It puts some extra pressure on you the teacher to use ‘rehearsal’ time as classroom discussion time.
But it’s a huge opportunity to help your students develop deeper understanding and appreciation of music theory.
Opportunity for repertoire exploration
Guided listening is huge. These pieces can’t just be assigned like Music Appreciation classes of the past.

But if you take time in your virtual rehearsals to guide your students through the source recording, they’ll gain a deeper understanding of the piece and their part in it.
An ensemble that has traditionally performed recent repertoire from Balmages or Saucedo may also find exploration of the “moldy oldies” interesting.
A deep dive into the Holst Suites, Persichetti, Grainger, and others via guided listening and some assigned excerpts would be enlightening.
Even if the parts are too difficult there are simplified arrangements that have been edited to suit the technical limitations of even beginner ensembles.
Make the most of it
No director is going to be thrilled at devolving an ensemble experience into glorified classroom music appreciation.
But doing so would serve to expand ears, develop musical maturity, and potentially whet the appetite for more advanced undertakings in future years.
Remember…
Sadly, students are dropping out of band during this insane time of pandemics and uncertainty. It’s happening in alarming numbers due to the lack of ensemble togetherness.
That alone is evidence of why it’s important to do a virtual band video project and keep your students engaged!

Download the Checklist
Want the print this guide and share it with your staff or student leaders?
Download the PDF version right here!
Print it, email it, or share it around with your co-teachers or ensemble staff.
Now it’s your turn

You’ve read the article. Now we need to know how you feel about it. Did we get it right? Did we miss anything? It’s your turn to let us know.
The first step?
Leave a comment to let us know what you think.
Planning to share this article with colleagues or friends? Or maybe you think we got it all wrong.
Either way, leave a quick comment below right now.


